Soil Profile Builder
Welcome to the Soil Profile Builder—your first step in truly understanding the ground beneath your feet. We’ve taken the smarts of soil science and simplified them into an easy-to-follow guide designed specifically for the hands-on DIYer. By looking deeper than just the surface, this tool helps you uncover the unique personality of your soil, giving you the confidence to help your yard reach its full potential.
In just three simple steps, we’ll walk you through testing your soil’s texture, pH, and organic matter (no fancy equipment required!). By the end, you’ll have a clear, personalized soil profile and a friendly action plan to help you build the healthiest possible foundation for your lawn and plants.
A Resource Built for Your Yard’s Journey
The Soil Profile Builder is a completely free resource with no account creation or sign-ups required, allowing you to start your analysis the moment you’re ready. Our vision is simple: to replace the confusion of trial-and-error with a clear, science-backed path. We want to help you stop guessing which products to buy and start investing in the specific amendments that will actually make a difference for your unique patch of land.
Since real yard work happens in stages, your session is automatically saved as you move through each step. You can pause to perform your soil tests and return exactly where you left off without ever losing your data. Once your profile is complete, you can bookmark your results for future reference or share the final report directly with your local garden center to ensure you’re getting exactly what your soil needs to flourish.

Ready to Build Your Soil Profile? Let’s Get Started.
To stop guessing how to treat your yard and start knowing for sure, we need to look beneath the surface. You’re about to perform three essential tests: Soil Texture Analysis, Soil pH Balance, and Organic Matter (OM). The actual “active” work for these tests only takes about 15 to 20 minutes using basic household items you likely already have.
For the texture analysis, you can choose the method that best fits your schedule and desired level of precision. The Ribbon & Feel Test is your “right now” option—it’s fast and hands-on for immediate results. The Jar Test is just as quick to set up, but requires a 48-hour waiting period to allow the soil layers to fully settle. This extra time is what provides a much higher level of scientific accuracy.
Regarding your soil’s pH, you have a choice between a simple home check or a more detailed reading. The Kitchen Method is a free way to use pantry staples for a quick “yes/no” look at whether your soil is acidic or alkaline. Alternatively, you can pick up a Soil Test Kit or Digital Probe from a local garden center. While this requires a small purchase, it provides the specific numerical values needed to truly fine-tune your soil’s chemistry. This choice lets you balance the convenience of an immediate estimate against the clarity of a more measured approach.
Once you’ve gathered your data from all three tests, you’ll submit them to our Soil Profile Wizard for a scientific evaluation. We’ll provide a custom roadmap for soil improvement, including exactly how to prep your ground months before planting and how to manage ongoing maintenance for a healthy, resilient landscape.
Soil Texture Analysis
The Ribbon & Feel Test
This serves as your primary “field method” for obtaining immediate, hands-on results. By carefully kneading a small sample of moist soil, you will gauge its tactile texture—gritty, smooth, or sticky—and measure the “ribbon” that forms. These combined cues allow you to accurately identify sand, silt, and clay content before the sample breaks under its own weight.
The Jar Test
Ideal for those who prefer scientific precision, this method utilizes the mechanical principle of sedimentation. While the active setup takes only minutes, you will allow the sample to settle for 48 hours. This waiting period is essential for the sand, silt, and fine clay to separate into distinct, measurable layers for a highly accurate percentage breakdown.
Soil pH Balance
This test identifies the acidity or alkalinity of your soil, which acts as the “gatekeeper” for nutrient uptake. Even the best fertilizers will fail if your pH is off-balance, as the grass roots become chemically unable to “digest” the minerals present in the ground.
Organic Matter (OM)
This measures the biological “life” within your soil. High organic matter improves water retention and provides a natural, slow-release buffet of nutrients. Understanding your OM levels helps you transition from a yard that survives on chemicals to one that thrives on a healthy, self-sustaining ecosystem.
Gathering Your Gear
First, head out to your yard with a trowel to collect your soil samples. While digging, take a moment to inspect the soil layers in the hole for the Organic Matter check. For the other tests, it’s best to take small amounts from different spots and mix them together in a bucket. Besides the soil itself, you will only need the following household items to complete your analysis in one smooth session:
Ribbon & Feel Test
You’ll want a small trowel to grab a fresh sample and a spray bottle of water to get the soil to a workable, dough-like consistency. Keep a rag or paper towel nearby, as this part of the process gets a little hands-on when you begin kneading the soil.
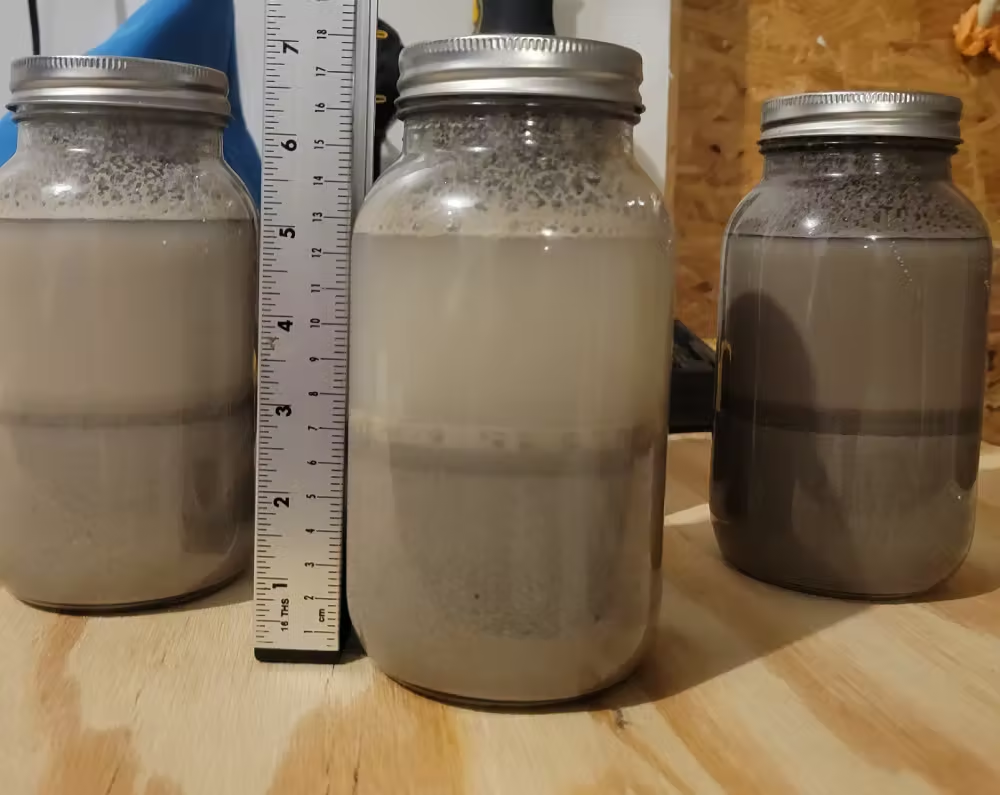
Jar Test
Grab a straight-sided clear glass jar with a tight lid—a standard mason jar works perfectly—along with some clean water and a drop of liquid dish soap. You’ll also need a ruler to measure the layers later and a steady spot where the jar can sit undisturbed.
pH Balance
If you are using a store-bought kit or probe, simply ensure you have it unboxed and ready. For the household kitchen method, you will need two small containers, some distilled water, and your “reactants”—standard white vinegar and a small box of baking soda from the pantry.
Organic Matter
This analysis is largely visual and tactile, so there is no need to collect a separate sample. You can simply reuse the soil gathered for your other tests or inspect the hole you’ve already dug. You’ll just need a flat surface and bright natural light to accurately judge the soil’s color and organic debris.
Hands-On: Performing Your Soil Analysis
Now that your gear is gathered and your soil samples are collected, it’s time to get to work. Follow the specific instructions for each of your chosen methods carefully to ensure you gather high-quality data for your evaluation. Once you’ve completed these steps, keep your notes nearby—you’ll need these exact results to power the Soil Profile Wizard and generate your custom soil improvement plan.
Clean and Moisten
Remove any debris from a golf-ball-sized soil sample. Slowly add water until the soil is moist enough to be molded like putty. It should be wet enough to hold a shape, but not so saturated that it leaves a muddy smear on your skin.
The Feel Test (Tactile Check)
Take a small pinch of the moist soil and rub it intensely between your thumb and forefinger. Don’t worry about the length yet—just focus on the sensation. Is it gritty like sand, smooth like flour, or sticky like glue? Note this primary sensation, as the Wizard will ask for it.
Create the Ribbon
Roll the remaining soil into a uniform ball. Place it between your thumb and forefinger and gently squeeze it upward into a flat ribbon. Let it extend until it breaks under its own weight. This specifically measures the “plasticity” provided by clay.
Measure the Breakage
Use a ruler to measure the longest ribbon you could produce.
- Under 1 inch: Suggests Sandy or Loamy soils.
- 1 to 2 inches: Suggests Clay Loam.
- Over 2 inches: Suggests Heavy Clay.
Record Your Data
You now have two specific data points: the tactile feel from Step 2 and the ribbon length from Step 4. Simply keep these two notes handy. Once you move to the final step, you will enter them into the Wizard, which will handle the scientific calculation to determine your exact soil classification.
Fill the Jar
Place your clean soil sample into a straight-sided jar until it is about one-third full. Ensure all large rocks and organic debris are removed, as these will not settle into the layers we need to measure for an accurate percentage breakdown.
Add Water and Soap
Fill the remainder of the jar with clean water, leaving just a small amount of headspace at the top. Add a single drop of liquid dish soap; this acts as a surfactant to break the tension and help separate the individual sand, silt, and clay particles.
Shake Vigorously
Secure the lid tightly and shake the jar thoroughly for several minutes. You want to ensure the soil is completely suspended in the water and that all clumps are fully broken down into a uniform, muddy slurry before you set it down.
The 48-Hour Wait
Set the jar on a flat, stable surface where it will remain undisturbed. While sand settles within minutes, you must wait a full 48 hours for the finer silt and clay to separate into distinct, visible bands. Moving the jar during this time will ruin the results.
Measure the Layers
Once the water is relatively clear and the layers have settled, use a ruler to measure the height of each distinct band. Sand will be at the bottom, silt in the middle, and clay on top. Record these measurements carefully for the Wizard.
Prepare the Samples
Place two separate samples of dry soil (about two tablespoons each) into clean, shallow containers. Ensure you’ve removed any large organic debris or stones. If you are using a digital probe instead of the kitchen method, simply clear a small patch of earth in your yard and skip to Step 4.
Check for Alkalinity (Vinegar)
Add a half-cup of white vinegar to your first soil sample and watch closely for a reaction. If the mixture begins to fizz or bubble, your soil is alkaline (a pH above 7.0). This reaction happens because the acid in the vinegar is neutralizing the bases present in your soil sample.
Check for Acidity (Baking Soda)
Moisten your second sample with distilled water until it is muddy, then add a half-cup of baking soda. If the soil begins to bubble or foam, your soil is acidic (a pH below 7.0). This indicates that the alkaline baking soda is reacting with the high acid levels in the ground.
Use a Kit or Probe (Optional)
If you purchased a test kit or digital probe for higher precision, follow the manufacturer’s instructions to get a specific numerical reading. Probes usually require a direct insertion into moist soil, while kits involve mixing soil with a specialized reagent to produce a color-coded result for your evaluation.
Record Your Result
If your soil didn’t react to either the vinegar or the baking soda in the kitchen test, your pH is likely neutral (around 7.0). Whether you have a simple “Acid/Alkaline” result or a specific number from a probe, record this data carefully to enter into the Wizard.
Inspect the Soil Surface
Take a sample of soil from the top 2-4 inches of your yard. Observe the very top layer for “duff” or “thatch”—this is the partially decomposed plant material that hasn’t fully integrated into the mineral soil yet but is a key indicator of biological activity.
Judge the Color
Spread your soil sample out on a white surface under bright, natural light. Compare it to a deep-subsoil sample if possible. Generally, the darker the soil (towards dark brown or near-black), the higher the organic matter content, as carbon-rich humus provides that deep pigmentation.
Check for Visible Debris
Sift through the sample with your fingers. High-quality organic matter includes tiny bits of roots, decayed leaves, and fungal filaments. If the soil looks like pure, uniform “dirt” with no visible organic structure, your OM levels are likely on the lower end.
The Sponginess Check
Unlike the “gritty” feel of sand, Organic Matter provides a “springy” or “spongy” sensation. Rub the dry soil: if it crumbles into soft, dark flakes (humus), your OM is high. If it feels like hard, unyielding pellets or fine dust, your OM is low.
Record Your Observations
Look for signs of life, such as earthworms or small insects, which are the primary drivers of OM breakdown. Record whether your soil is “Pale/Sandy” (Low), “Brown/Crumbl” (Medium), or “Dark/Spongy” (High) for the Wizard’s final calculation.

The Pre-Flight Checklist
I have my Feel/Ribbon or Jar results.
I know my soil’s pH (or fizz result).
I have my Organic Matter notes
Launch the Soil Wizard