
Scientific Name: Euphorbia maculata, also written Chamaesyce maculata
Spotted Spurge
The pre-emergent escape artist
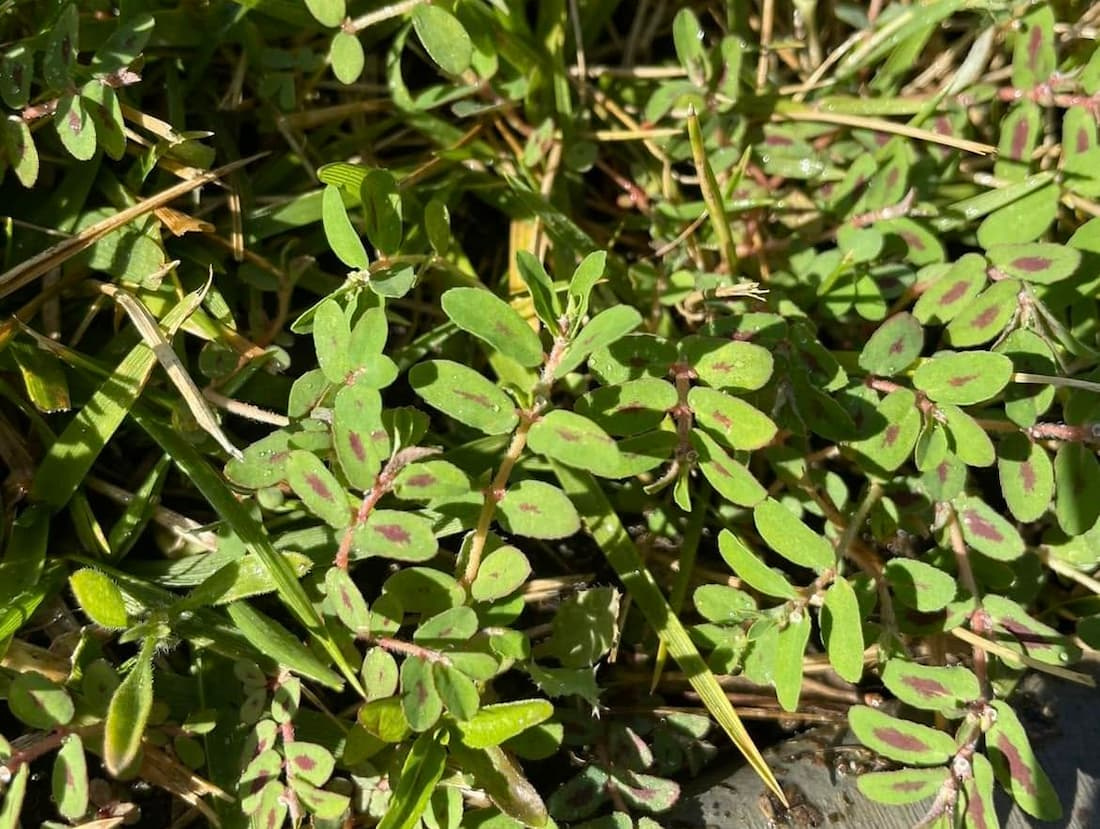
Spotted Spurge At-a-Glance
Weed Type
Broadleaf
Life Cycle
Summer annual
Growth Habit
Prostrate, mat-forming
Root Type
Taproot
Spreading Risk
High — by seed
Pull
Yes, with caution (before it sets seed)
Identity & Diagnostics
Visual Fingerprint
Look for a flat, circular mat pressed tight against the ground, spreading out like a wheel from one center point. The small oval leaves grow in neat opposite pairs, and most of them carry a distinct maroon or purplish spot right in the middle — that spot is where the plant gets its name. The stems are slender, round, and pink to reddish, and the whole plant hugs the soil so closely that a mower blade passes right over the top of it. Snap any stem and it bleeds a milky white sap almost instantly; nothing else that looks like this in a lawn does that.
Structural Anatomy
Up close, five features together confirm spotted spurge. First, the milky white sap — every part of the plant leaks it the moment it’s cut, and this is the single fastest way to know you’re dealing with a spurge and not something else. Second, the central leaf spot, a dark maroon-to-purple blotch over the midrib, present on more than 95 percent of mature leaves. Third, strictly opposite leaves on very short stalks. Fourth, slender, round, hairy stems colored pink to deep red, with the color deepening in strong sun. Fifth, the flat radial mat growing out from one central crown above a single taproot.
That taproot is usually only 4 to 6 inches deep, but in sandy or compacted soil it can drive down 18 to 24 inches. One more anatomical point matters enormously for control: the stems do not root where they touch the ground. The whole mat is held by that one central root and nothing else.
A safety note that belongs with the anatomy: the milky sap isn’t just a handy ID clue. It contains irritant compounds that can cause skin rashes and blistering, and if it gets in your eyes it can do real, lasting corneal damage. Treat the sap as the hazard it is whenever you handle the plant.
Growth Patterns & Life Stages
Spurge moves fast, and each stage tells you something about what to do. Seedlings appear in late spring and summer with two small oblong seed leaves that are often maroon underneath; the first true leaves are already in opposite pairs and may already show a faint central tint. This is the ideal moment to act. In the vegetative stage, stems elongate sideways from the crown into the low flat mat, and the leaf spots darken — post-emergent sprays still work well here if the plant is young. Then comes the part that catches people out: spurge reaches the flowering and seed stage astonishingly quickly, producing viable seed in as little as five weeks from germination (three to four weeks when it sprouts in mid-summer heat). Once the tiny cup-shaped flowers and three-lobed seed capsules appear in the leaf joints, you’ve missed the clean window — the plant is now reseeding continuously and resisting sprays.
Gallery
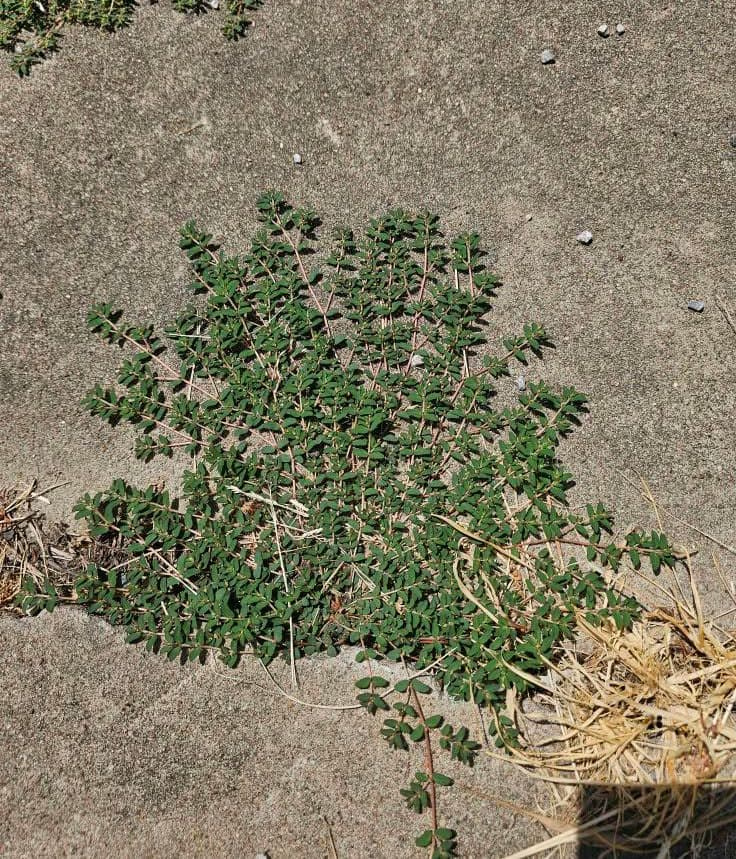
A mature spotted spurge plant forming a prostrate, radial mat out of a concrete seam.
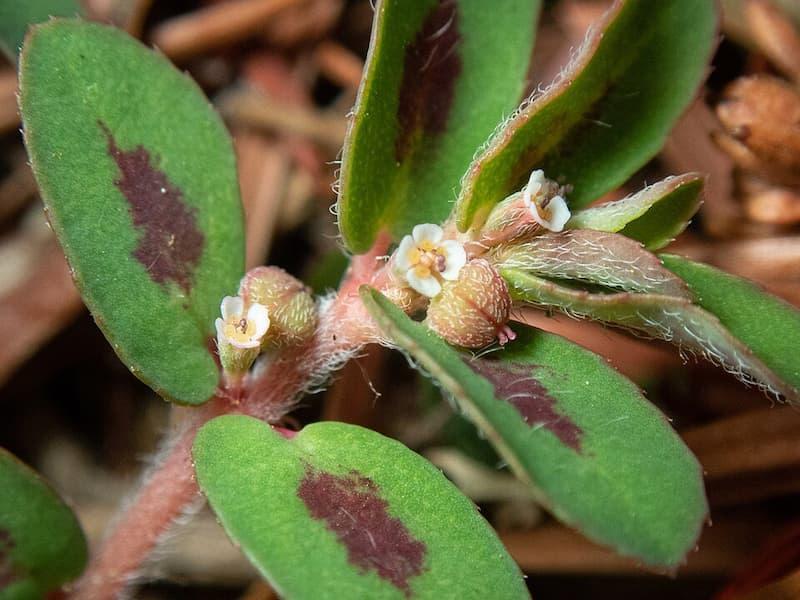
Diagnostic Feature: Each small oval leaf carries a telltale maroon-red spot near its midrib — the trait that gives spotted spurge its name.
“Euphorbia maculata flower (10)” by Don Loarie is licensed under CC BY 4.0.
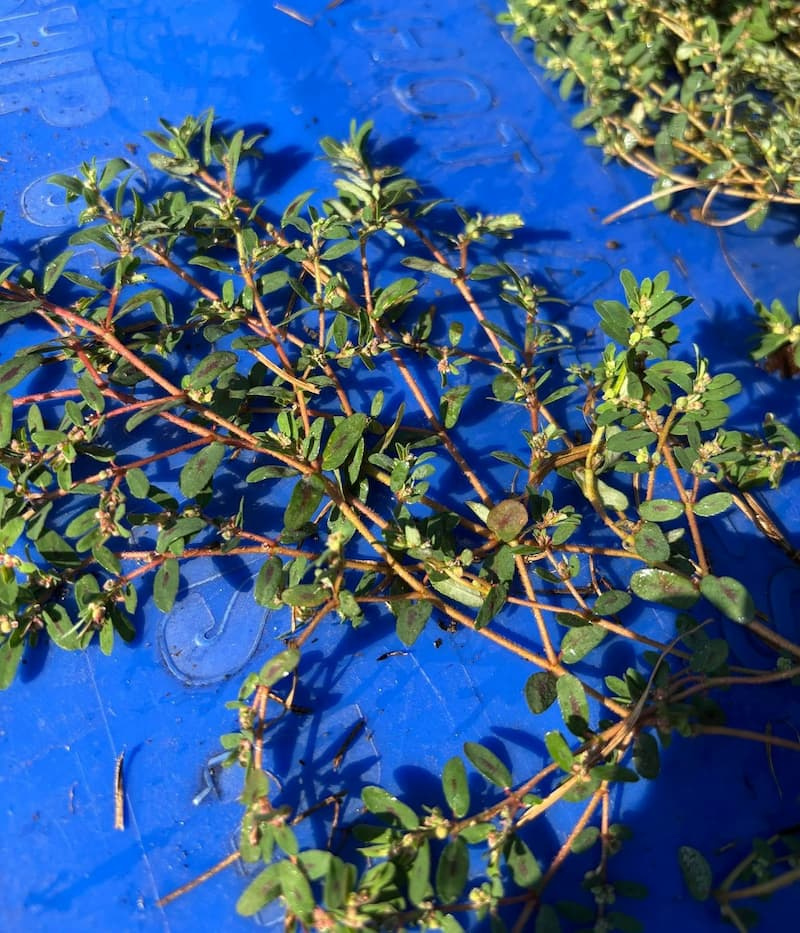
Close-up of opposing leaves with dark central spots and distinct hairy stems.
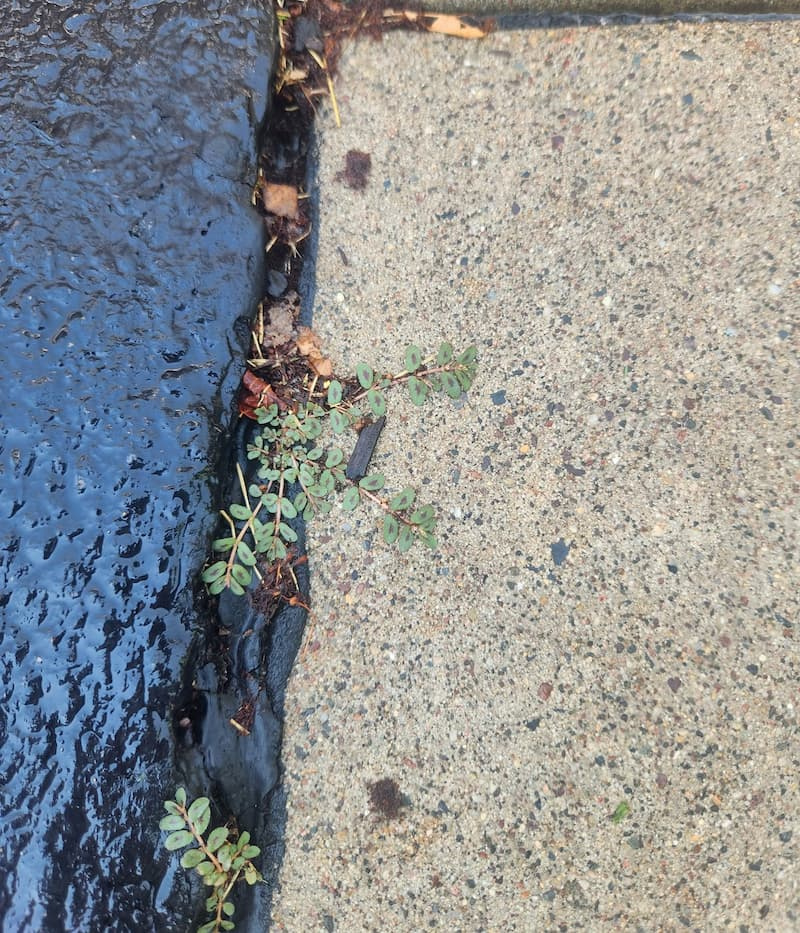
Early-stage spotted spurge taking advantage of heat along an asphalt driveway edge.
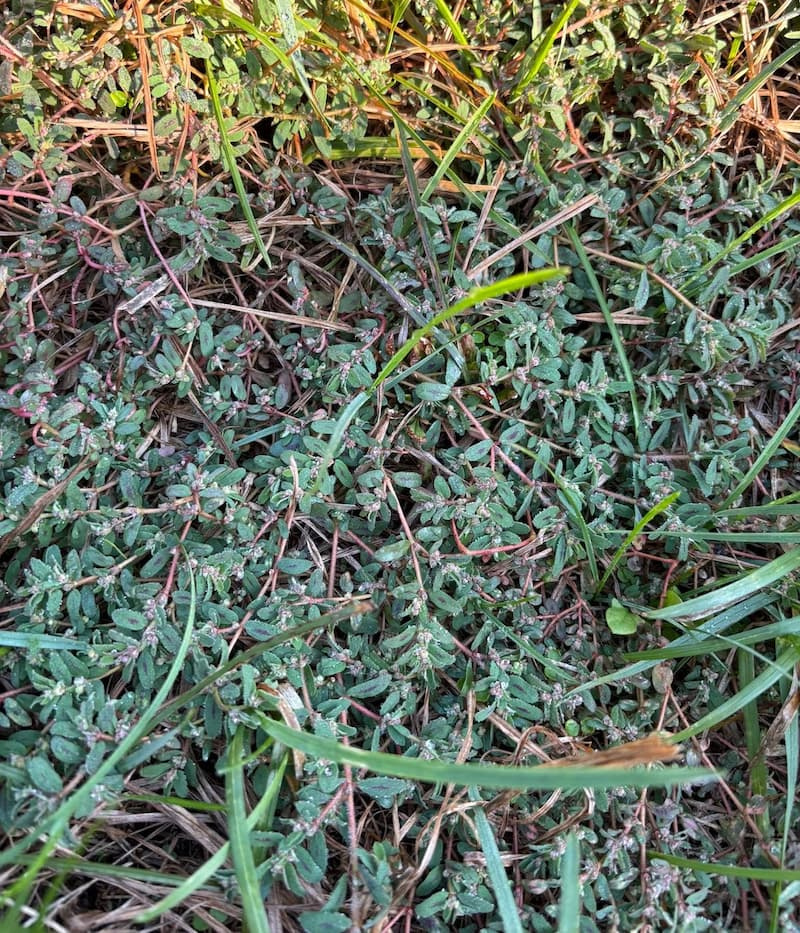
Spotted spurge establishing a dense, low-growing network within a sunny lawn area.
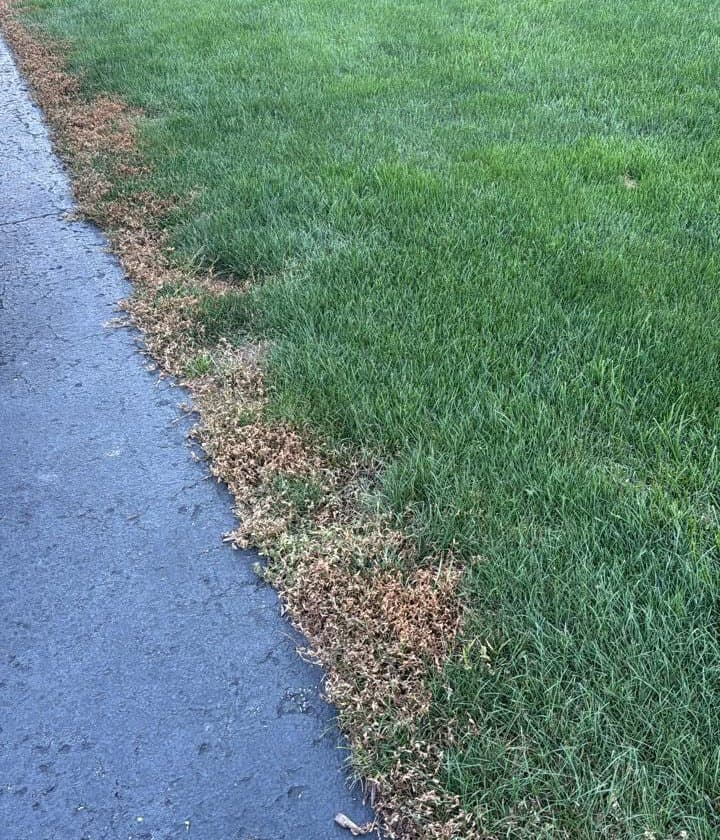
Rapid burndown of spotted spurge along a driveway edge 48 hours after a selective post-emergent application. Reseeding can typically begin 1 to 2 weeks after treatment.
The Identity Trap
Common Lookalikes
Two plants get mistaken for spotted spurge in a real yard. Common purslane forms the same kind of flat mat in the same hot, bare, disturbed ground. And the other prostrate spurges — spreading spurge (Euphorbia humistrata) and creeping spurge (Euphorbia serpens) — look almost identical to spotted spurge at a glance.
Identification Differentiators: How to Tell Them Apart
Versus purslane: break a stem. Spotted spurge bleeds milky white sap; purslane bleeds clear, watery sap. Purslane’s leaves and stems are also thick and succulent — like a little jade plant — while spurge’s are thin and hairy. This one test settles it every time, and it matters, because purslane is harmless (people eat it) while spurge is not.
Versus the other spurges: check two things — the leaf spot and whether the stems root where they touch the soil. Spotted spurge almost always has the dark central leaf spot and never roots at its stem nodes. Spreading and creeping spurge root readily at the nodes, and creeping spurge is hairless with no leaf spot. This distinction isn’t just trivia: if you pull what you think is spotted spurge but it’s actually a node-rooting cousin, every stem fragment you leave behind can grow into a new plant.
Growing Conditions
Host Grasses
Spurge doesn’t establish because of which grass you have — it establishes because of where the grass isn’t. Any thin, weak, or open turf is fair game: tall fescue and Kentucky bluegrass that have thinned under summer heat, bermudagrass or zoysiagrass worn down by traffic or compaction, and especially newly seeded lawns started in late spring or summer, where the young grass simply can’t close the canopy fast enough to shade out germinating spurge. Because spurge grows flat, it survives close mowing that stresses the grass further — so scalped lawns actively tilt the odds in the weed’s favor.
Host Environment/Area
Spotted spurge is a heat specialist. It’s a C4 plant, built to run at peak efficiency in strong sun and high temperatures, and it shows up wherever the ground is hottest and most exposed: cracks in sidewalks, driveways, and patios; the edges of paved paths, gravel, and mulch; sun-baked bed margins; and dry south-facing slopes. It colonizes lawns and ornamental beds about equally — it doesn’t prefer one over the other, it simply takes whatever bare, warm soil it can find. In beds on drip irrigation, it often clusters right around the emitters, where the moisture is.
Soil Indicators: What the Presence of This Weed Reveals About Your Yard
Where spurge takes over, it’s telling you something about the ground. It’s a reliable indicator of soil compaction — its deep taproot punches through dense soil that grass roots can’t handle. It signals bare or thinly covered soil, because the seeds need light and won’t germinate unless the surface is exposed. It points to low fertility, thriving where the nitrogen and organic matter that would feed vigorous grass are lacking. And it flags heat and drought stress, favoring dry, exposed spots that dry out fast. In parts of the Southeast, a stubborn, recurring spurge problem in sandy soil can even be a downstream sign of root-feeding nematodes thinning the turf from below. Read spurge as a symptom, not just a problem — fixing the compaction, the bare ground, and the thin feeding usually does more than any spray.
Lifecycle and Season
Lifecycle Category and Management Implications
Spotted spurge is a summer annual that reproduces only by seed — it has no roots, runners, or bulbs that survive the winter. That’s genuinely good news, because it means two of your most powerful tools actually work here: a pre-emergent barrier can stop the seeds before they sprout, and there’s no underground network to regenerate after you kill the top. The entire fight is about seeds — stopping them from germinating, and stopping the plants you miss from making more before frost kills them.
Germination Trigger
Germination starts when soil in the top inch reaches about 60°F, and it peaks when soil and air sit between 75°F and 85°F. Seeds keep germinating in flushes all summer, right up to soil temperatures near 100°F, as long as there’s moisture. Two conditions are non-negotiable for the seed: it needs light, and it won’t emerge if it’s buried deeper than half an inch. That single fact — light-triggered, surface-only germination — is the hinge that cultural control and mulch both turn on.
Here’s the timing trap, and it’s the most important thing on this page. Spurge germinates later than crabgrass. Crabgrass fires off when soil hits 55°F in early spring; spurge waits for 60–65°F and doesn’t hit full stride until the soil is above 75°F in mid-summer. So the standard “crabgrass preventer” you put down in early spring has largely broken down in the soil by the time spurge’s heaviest flushes arrive. The fix is to not rely on a single early application: either put down a second pre-emergent application about six to ten weeks after the first to keep the barrier alive into summer, or — if spurge is your main target — hold the application until late spring and water it in before the soil reaches 60°F. Post-emergent sprays work from late spring through mid-summer, but only while plants are young.
In the South, the season is long and the problem is bigger. Warm soil means spurge can germinate in continuous, overlapping waves for most of the year where frost is rare, stacking generations one on top of another. Pre-emergent timing follows the same logic as the cool-season zone but stretches further: expect to make a sequential application (roughly two months after the first) to bridge an eight-to-ten-month germination window, because products like isoxaben lose strength in warm, moist soil within a few months. One warm-season-specific caution on the post-emergent side: St. Augustinegrass and centipedegrass are easily injured by standard 2,4-D and dicamba mixes, and the risk climbs sharply once temperatures pass 85°F — on those grasses in summer heat, reach for a heat-safe option (see Post-Emergent in Lawn) instead.
The transition zone is the hardest of the three, because nothing here is ever fully in its comfort zone. Three specific conflicts collide around spurge. First, spring pre-emergent versus spring renovation: the same chemistry that blocks spurge seed also blocks grass seed, so if you’re seeding or sodding in spring you can’t lay down a pre-emergent — and the bare soil you’ve just created is exactly what spurge colonizes in mid-summer. Second, warm-season green-up injury: spraying post-emergents over bermudagrass or zoysiagrass while it’s still waking up from dormancy can scorch it and stall green-up. Third, the pre-emergent decay gap: the early-spring crabgrass barrier fades by mid-summer, right when spurge peaks, which forces a second application in late spring or early summer. And if you’re planning to overseed cool-season grass in September, you generally can’t apply pre-emergent after about July 1 without killing the new seed — leaving late-summer flushes unprotected. There’s no way to make all of these disappear; the job is to pick which conflict you can live with and plan the calendar around it.
Herbicide Control
Pre-emergent is your best tool against spurge, because stopping seed is the whole game. Effective active ingredients include isoxaben (the strongest broadleaf-specific option), prodiamine, pendimethalin, dithiopyr, and sulfentrazone; in warm-season turf, indaziflam and oxadiazon (the latter safe even on new sod and sprigs) are also options. The timing is the catch: a single early-spring application aimed at crabgrass will have faded before spurge’s mid-summer peak. Plan for a split or sequential program — a second application roughly six to ten weeks after the first — or delay a single application to late spring, watered in before the soil hits 60°F.
Two safety notes. These products also stop desirable grass seed, so don’t seed and pre-treat the same area — seeding usually has to wait months after application, per the label. And if you must seed in spring, siduron or mesotrione are the seeding-safe choices (mesotrione is safe when seeding Kentucky bluegrass, perennial ryegrass, and tall fescue, but not fine fescues).
When plants slip past the barrier, hit them young — from the seedling stage through a few leaves, while they’re small and actively growing. The window is narrow: control drops off sharply once the plant has four or more leaves, and it’s poor once the mat is flowering. The workhorses are the synthetic-auxin broadleaf herbicides — 2,4-D, dicamba, MCPP, triclopyr, and dichlorprop, usually sold as two- or three-way blends — which move through the plant to the root. Fast-acting contact products like carfentrazone and sulfentrazone burn the top down quickly but don’t reach the taproot on their own, so used alone they let the plant regrow from the crown; pair them with a systemic partner. Add a non-ionic surfactant to systemic sprays to help them stick to the hairy leaves — but never add surfactant to sulfentrazone, which can then scorch your turf. A practical tip that improves results: don’t mow for a few days before or after spraying, because fresh cuts make the plant weep sap that blocks absorption.
In warm-season lawns, remember the heat rule: on St. Augustine and centipede above 85°F, skip the 2,4-D/dicamba blends and use a heat-safe product such as a metsulfuron- or Celsius-type herbicide instead. One product to skip regardless of zone — clopyralid (Stinger) simply doesn’t control spurge.
The verdict for the lawn: this is a multi-season job. A perfect year of pre-emergent plus prompt removal clears this year’s plants, but the seed bank guarantees more next summer.
Everything that makes your grass thick works against spurge, because spurge needs bare, sunny soil to start. Mow high — toward the top of your grass’s range (around 3 to 4 inches for tall fescue) — so the canopy shades the soil and denies seeds the light they need. Relieve compaction with hollow-tine core aeration, since spurge is a compaction specialist; time it when the grass is growing so it heals fast, and always aerate before laying down pre-emergent, because pulling cores punches holes right through a barrier you’ve already applied. Water deeply and infrequently rather than lightly and often — frequent shallow watering keeps the surface half-inch damp, which is precisely the germination zone spurge wants. And overseed thin spots in late summer or early fall so the lawn goes into next summer already dense.
In beds, the winning move is a pre-emergent applied to settled, weed-free soil beneath the mulch layer. Good options include isoxaben, prodiamine (use granular — the spray formulation injures many herbaceous plants), dithiopyr (labeled safe over the top of hundreds of ornamentals), pendimethalin (granular), s-metolachlor, and trifluralin + isoxaben (Snapshot). Placement matters: applied over the top of mulch, these products get trapped on the dry surface and break down in sunlight before they ever reach the soil, so they need to go under the mulch — or be watered in with at least half an inch of irrigation to carry them through. Residual control runs roughly 8 to 12 weeks, so plan a sequential application to cover the long germination season.
Watch the plant list. Isoxaben can injure hydrangea, some euonymus, Ajuga, yucca, foxglove, lamb’s ear, and speedwell (Veronica); Snapshot can hurt foxglove, lamb’s ear, sedums, veronica, and dianthus. And keep any pre-emergent off the root zones of newly transplanted ornamentals until the soil has settled and firmed — chemical slipping into cracks around fresh roots can stunt or kill the plant.
For plants already up, you have two paths: careful hand-removal (easier here, since loose moist bed soil gives up the whole taproot cleanly) or a directed spray. For spot-treating large established mats, a directed glyphosate application is highly effective, and it’s chosen here for a specific reason: glyphosate grabs onto soil particles and stays put, so it won’t wash down and get taken up by the roots of nearby trees and shrubs. (Buying tip: not every product labeled “Roundup” is glyphosate anymore — check the active-ingredient panel before you buy.) Keep it off any green ornamental tissue or thin bark. Other directed options include glufosinate and diquat (fast contact burn-down — cover the whole mat), pelargonic acid (an organic contact spray that works best above 80°F on small seedlings), and directed sulfentrazone (fine around established woody plants, but never over ornamental foliage or where bulbs and non-woody perennials grow). Be very cautious with clopyralid near beds — it damages many broadleaf ornamentals at tiny concentrations and persists through composting.
Bed verdict: also multi-season, but with a real advantage — because pulling is so clean in loose soil, disciplined hand-removal of young seedlings on a two-to-four-week scouting schedule can carry a bed most of the way on its own.
Mulch is one of the best tools you have against spurge, precisely because the seed needs light and won’t emerge from below half an inch. Lay organic mulch 2 to 3 inches deep for fine-textured material, or 3 to 4 inches for coarse bark nuggets and wood chips, which leave more gaps. Two failure modes to know: coarse chunky mulch leaves light-gaps between the pieces where seeds slip through, and any mulch that has broken down into a fine layer on top — especially if kept constantly wet — becomes its own little seedbed that spurge will germinate right on. Keep the layer topped up and let the surface dry between waterings.
Herbicide Application Reference
On warm-season lawns, the synthetic-auxin blends (2,4-D, dicamba, MCPP) can injure St. Augustinegrass and centipedegrass, and the risk rises sharply above 85°F — switch to a heat-tolerant product on those grasses in summer. Around beds, two products deserve extra caution: metsulfuron can be picked up by the roots of nearby ornamentals, and clopyralid is phytotoxic to many broadleaf ornamentals at only a few parts per billion and stays active in compost for up to two years, so treated clippings must never be composted or used as mulch. On sandy soil and slopes, sulfentrazone and clopyralid can also leach or run off toward sensitive plantings.
A product note that is easy to miss: the consumer “Roundup” brand no longer reliably means glyphosate. Several reformulated versions now use different active ingredients, and some of them — imazapic is one — stay active in the soil, where nearby ornamental roots can take them up. That is the exact problem glyphosate is chosen to avoid in a bed. Before you buy, read the active-ingredient panel and pick a product whose only active ingredient is glyphosate.
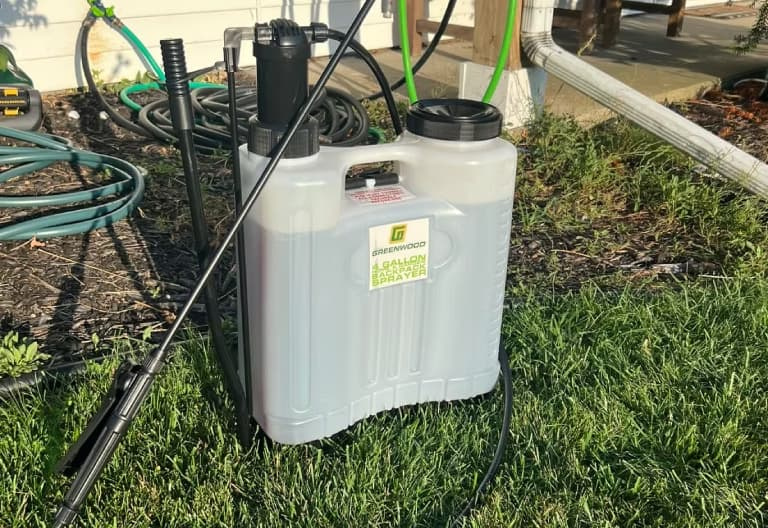
Herbicide Application Guide
New to spraying, or want to get it right? Our Herbicide Application Guide covers the practical steps this page assumes — mixing, calibration, protective gear, and the wind and temperature limits that decide whether a treatment works or drifts. Read it before you spray.
See Guide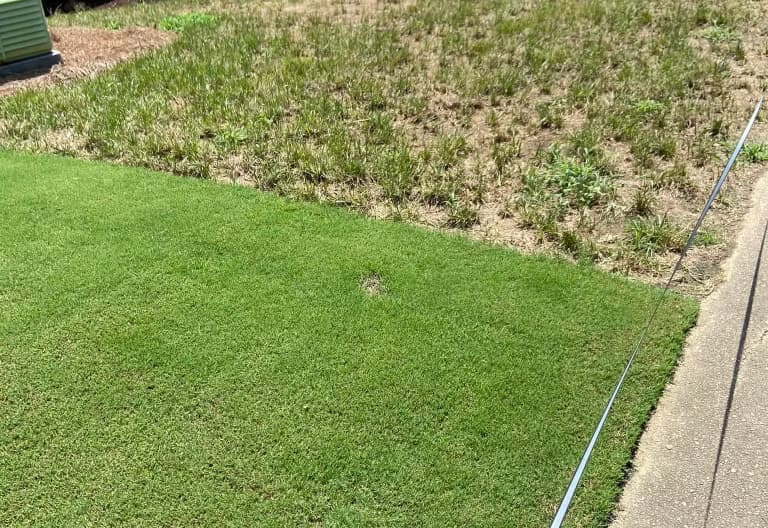
Where Two Lawns Meet
Does your lawn border a neighbor’s — or meet a different type of grass? Spraying near that line can quietly damage the yard next door, sometimes weeks later. Where Two Lawns Meet shows you how to treat safely without harming either side.
Read ArticlePulling
Yes — pulling works, but only if you get the whole taproot out and do it before the plant sets seed.
The Biological Reason
Two things make or break hand-pulling. The first is the taproot. Spurge is held by one central root, and if you yank a mature plant out of dry ground, the stems tear away at the crown and leave that root sitting in the soil, where it simply pushes up new growth. Pull when the soil is moist — after rain or a good watering — so the whole root slides out clean. Get a gloved hand under the mat, gather the stems, grip the main stem right at the center over the crown, and pull straight up. Seedlings come out effortlessly; mature plants with a deep root in dry, compacted soil are the ones that fight back.
The second thing is timing, and it’s ruthless. Spurge can go from sprout to shedding seed in about five weeks, and a single mat can drop on the order of 500 seeds per square foot. Once the seed capsules have formed, any disturbance — pulling, raking, even brushing the mat — pops them open and scatters seed. So the safe removal window is the few weeks before seed set, and it closes fast. Never drag or rake a mature plant across the soil; that’s a seed-spreading machine. Bag pulled plants and put them in the trash — not the compost, because the seeds survive composting — and clean your tools, shoes, and mower deck afterward, since the seeds turn sticky when wet and hitchhike everywhere.
One reassuring point: because spurge stems don’t root where they touch the ground, you don’t have to worry about stray stem fragments taking root the way you would with its node-rooting cousins. Miss a fragment and it just dies. The only thing that regrows is that central crown-and-taproot — so that’s the whole thing you’re aiming to lift out. And wear gloves and eye protection every time: the milky sap is a genuine skin and eye irritant.
Lawn vs. Bed Pulling Difference
This is one weed where the environment really does change the outcome. In loose, cultivated bed soil that’s been watered, the entire taproot slides out intact and the plant is gone for good. In compacted lawn or path soil, that same pull usually snaps the stems off at the crown and leaves the root behind to regrow. Same technique, very different success — which is why beds reward hand-pulling and hard turf rewards getting the soil moist first.
Quick Reference Summary
| Lifecycle Category | Summer annual (seed only) |
| Active Zone(s) | All zones; worst in summer heat |
| Germination Trigger | Soil ~60°F to start, peaks 75–85°F; needs light, top ½ inch only |
| Pre-Emergent | Yes — primary tool (split/sequential timing) |
| Post-Emergent Timing | Seedling to a few leaves; poor once flowering |
| Pull | Yes, with caution — whole taproot, before seed set |
| Lawn Primary Tool | Pre-emergent + selective post-emergent |
| Bed Primary Tool | Mulch + pre-emergent under mulch; directed spot-spray |
| One-and-Done or Multi-Season | Multi-season (persistent seed bank) |
Frequently Asked Questions
These answers are synthesized from botanical morphology studies and herbicide efficacy trials conducted by leading university agricultural extensions.
Because spurge germinates later than crabgrass. Your barrier was timed for 55°F soil in early spring, but spurge waits for warmer soil and peaks in mid-summer, by which point the pre-emergent has mostly broken down. A second application in late spring or early summer closes that gap.
Two reasons. If the stems snapped at the crown and left the taproot behind, it regrew from the root — pull when the soil is moist so the whole root comes out. And even a perfect pull doesn’t touch the seed bank, which can keep sprouting new plants for years.
The milky sap is an irritant — it can cause skin rashes and, if it reaches the eyes, serious irritation or damage, and it’s toxic if eaten. Keep children and pets away from broken plants, and wear gloves and eye protection when you remove it.
No. Spurge seeds are tough enough to survive a home compost pile and will re-infest your beds when you spread the finished compost. Bag pulled plants and put them in the trash.
No — and it can make things worse. Spurge grows flat, below the mower blade, so mowing doesn’t touch it while it stresses the grass around it. A dense, tall-mowed lawn suppresses spurge far better than frequent low mowing.
You can spot-treat large mats with a directed glyphosate spray, kept off your ornamentals. Just check the label first — the “Roundup” brand no longer always contains glyphosate, and some newer versions leave soil residue that nearby plant roots can absorb, which is exactly what you don’t want in a bed.
Scientific Authority
This profile is constructed using forensic botanical data and Integrated Pest Management (IPM) research. We prioritize scientifically-vetted identification and control methods that protect the broader ecosystem while ensuring successful eradication based on peer-reviewed agricultural studies.
Primary Resources
- Penn State Extension
- Ohio State University Extension
- University of Wisconsin Horticulture
- Michigan State University Extension
- University of Illinois Extension
- Cornell University Turfgrass
- Rutgers Cooperative Extension
- University of Minnesota Extension
- Iowa State University Extension
- NC State Extension / TurfFiles
- University of Florida IFAS
- University of Georgia (GeorgiaTurf)
- Clemson HGIC
- Texas A&M AgriLife (Aggie Turf)
- Auburn / Alabama Extension
- University of Arkansas Cooperative Extension
- LSU AgCenter
- University of Missouri Extension
- Virginia Tech Extension
- Oklahoma State University Extension
- West Virginia University Extension
- University of Tennessee Extension
- UC IPM / UC ANR
- Weed Science Society of America.]